Adding images to a WordPress post is essential to give your post some visual spice and flair. Here’s how to add images to a WordPress post.
It’s no secret that visual elements such as images and videos elevate the entire viewing experience for readers. The developers of WordPress understand the importance of media with content, which is why you get the ability to add images to a post in WordPress easily.
Must Read: WordPress 101 – Install WordPress Plugins on Website
Apart from adding images within the post, you can also set a featured image which essentially becomes the selling point for the post. This tutorial will focus on how to upload images from your computer to WordPress or add them using a URL.
How to add images to a post in WordPress
You can either choose to add images to your post directly when creating a new post or add them separately using the “Media” tab from the WordPress Dashboard. WordPress also hands you the ability to add an image to your post from a URL.
Adding images from the Media Library
If you have previously uploaded an image to the WordPress Media Library, you don’t need to upload it again in order to add it to your post.
- When creating a new post, press the “Add Media” button, and the Media Library will pop up, showing all the images that you have uploaded to it earlier.
- You can now use the search box to find the image that you want to add to your post or scroll down on the pop-up window to find the image manually.

- Once you’ve found the image, go ahead and click on it to select it, where you can now add the “Title” and “Alt Text” from the right-hand side.
- Once you’re ready, click on “Insert into post” button at the bottom to add the image to your post.
Uploading images to the Media Library
Since you can access the Media Library while creating a new post, you can add images directly from the post editing screen.
- Click on “Add Media” button on the screen and select the “Upload Files” tab on the top-left corner.
- Press on “Select Files” to open the file explorer and select the images from your computer that you want to upload.
- You can also just pick and drag and drop the images that you want to upload directly onto the pop-up menu.

- Once the images are uploaded, they will automatically show up on your Media Library, where you can give them “Title” and “Alt Text” tags.
- You can also provide the image caption text by filling up the “Caption” tab and also assign the image a clickable link.
- Now you can click on “Insert into post” to add your newly uploaded image to the post.
Adding an image from a URL
Rather than uploading images to your Media Library, WordPress also allows you to add images directly from their URL.
- Click on “Add Media” button on the screen, and you will see the sidebar on the right-hand side with the option that reads “Insert from URL”.
- Simply copy and paste the URL of your desired image into the empty field and insert any link text if you wish to do so.
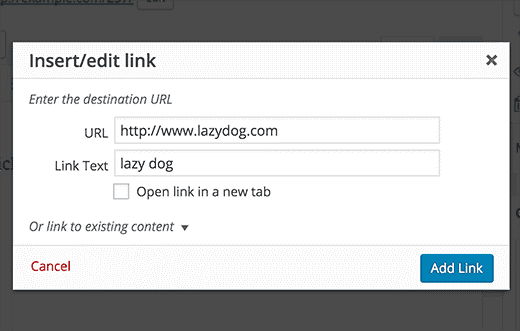
- With the URL added, simply click on the “Insert into post” at the bottom-right corner of the pop-up window to add the image to your post.
Final Words
From a travelling WordPress post where you need images for showing your readers the most happening places around to real estate post helping your readers with property knowledge, every WordPress post should have images to describe and showcase your content. We hope our guide to adding images to a WordPress post has helped you in making your post more visually appealing.