
Here’s a quick guide on how to save notes from iPhone to Mac/Windows without too much hassle.
Apple took a simple Notes feature and added it to the core of iOS, which is undoubtedly more popular than any other notetaking app. However, unlike other notetaking apps such as Google Keep, the Notes app is native to iOS, which makes saving and sharing them a royal pain.
However, some ways allow you to save notes from iPhone to Mac or Windows PC, either by using iCloud or a third-party app. You can back up all your saved notes and sync them with your iCloud account, which can later get accessed from the web. At the same time, the second method enables you to extract and learn how to save notes from iPhone to your computer.
Here are some methods to save iPhone notes to Mac/Windows
Method 1: View Notes app on Mac or PC using iCloud
Before you can view your saved notes from your Mac or PC, you need to ensure that the Notes app gets synced with iCloud.
Part 1: Sync and save notes from iPhone to iCloud
Open the Settings app on your iPhone and access the iCloud tab in the menu. You will now be able to view all the installed apps that are getting synced with your iCloud account.
If the toggle switch next to the Notes app is not enabled tap on it so that it turns green and syncs your notes with your iCloud account. Doing this will ensure that all the future notes will be saved to your iCloud account, but you will need to manually move the old notes.
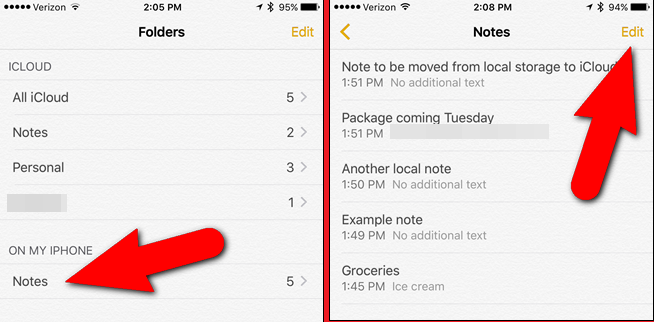
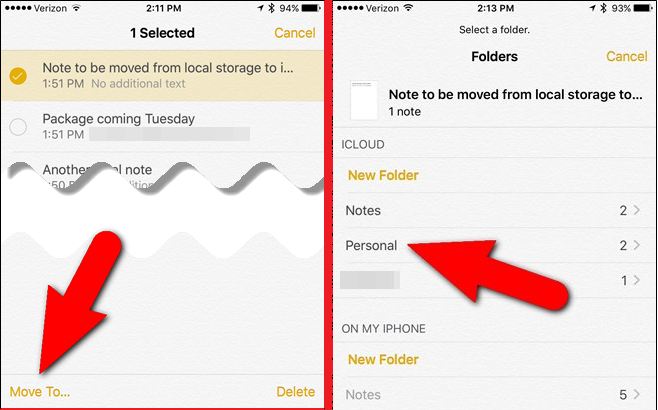
Go in the Notes app on your iPhone and tap on the Notes folder under the section “On My iPhone”. Press the “Edit” button on the top-right corner and select all the notes you want to move to iCloud. After selecting the notes, press “Move To” and then choose any folder under the “iCloud” tab, or create a “New Folder” and move the files.
Part 2: Access the saved notes from Mac/Windows computer
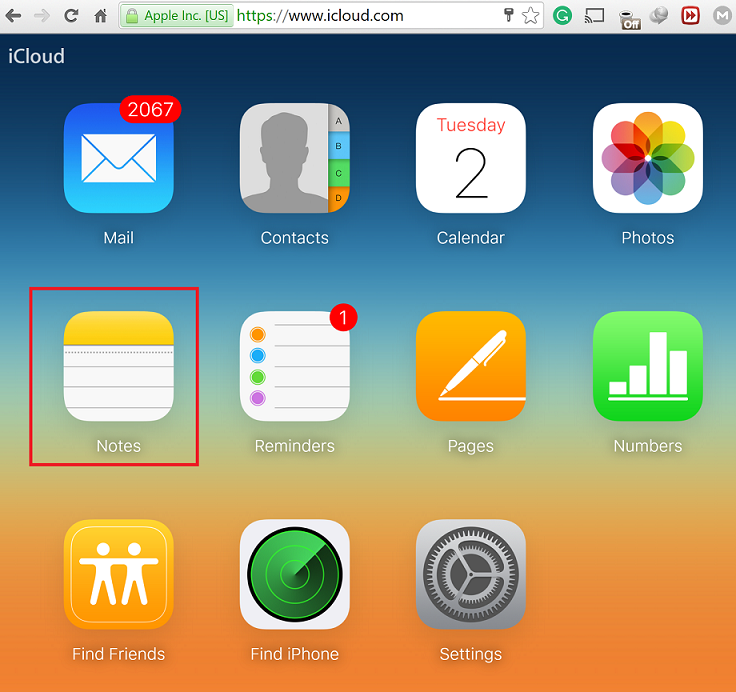
Now that you have synced and moved your notes, open the iCloud website to access the Notes app online. Sign in to your iCloud account, and you will be able to see a list of Apple apps, along with the Notes app.
Within the web version of the Notes app, you will be able to view the notes you have saved. Moreover, you can also edit these notes, or even create new notes from the same screen. Unfortunately, the web app does not allow you to learn how to save your iPhone notes to Mac and PC directly.
However, you can copy the content of the notes using your mouse and paste them on the Notepad. You can then share the content or save the note as a “.txt” file on your computer without any hassle.
Method 2: Access notes using a third-party app
If the iCloud method seems too complicated, and you don’t mind giving device access to a third-party app, there are plenty of choices out there. While there are a bunch of programs such as CopyTrans, iCopyBot, and many other, iExplorer is the one we will use for this guide.
Download iExplorer by Macroplant for PC
Download iExplorer by Macroplant for Mac
Once you have downloaded and installed iExplorer on your Mac or PC, connect your iPhone to your computer. If the iPhone prompts you to “Trust this computer”, press “Trust” so that iExplorer can access the data on your device.
Open the iExplorer app on your computer and once your iPhone is recognized, click on the “Notes” tab under the “Data” menu. You will be able to view all the saved notes on your computer screen, along with their save data.
To understand how to save notes from iPhone to Mac or PC, click “Export Selected Note” or “Export All” on the bottom-left corner of the window. You can even select the text from a specific note and save it as a text file just like you would in iCloud.
Still, trying to figure out how to save notes from iPhone? Here is a quick video tutorial to help you make sure your notes as safe and sound.
Related Posts.