Privacy settings on Windows 10 you should know about. Use these privacy settings on your PC so that you have privacy control on your Windows 10 computer.
Back in the day when privacy was not a looming concern for users, Microsoft Windows barely offered any insight into what security features implemented and the privacy settings that were in place. As the internet has evolved and user data collection has become the digital currency of the modern-day, Microsoft has grown to offer an open-book approach to privacy settings on Windows 10. There have been plenty of red flags that monitored when it comes to a range of user tracking features that built into Windows 10.
From the virtual voice assistant Cortana that is always listening in and analyzing your user pattern to serve you better, to advertisement targeted based on your usage history, there are plenty of privacy concerns when it comes to Windows 10. Cortana brings transparency in terms of privacy settings. The operating system offers ways to tone down these user data tracking features and helps you reclaim your computer machine. We’ve highlighted the most useful settings in Windows 10 that are sure to put your privacy as a priority.
Privacy Settings on Windows 10 you need
We have found the best privacy settings in Windows 10 that are usually hidden in plain sight for casual users. Use these privacy settings to have control over your data and privacy in a Windows 10 computer
Disable Ad Tracking

Official Microsoft Windows 10 user gets assigned an Advertising ID by the system. Which suggests ads to you based on the usage of your app. While this feature allows the company to offer you targeted advertisements, it does raise some privacy concerns over which you would want to disable it. However, the good part is that Windows 10 gives you the ability to turn off these personalized ads the easy way:
- From the home screen of your system, head over to the Settings app.
- Navigate your way to Privacy – General, where you will see the Advertising ID toggle.
- Press the toggle switch to disable it, which should keep the personalized ads at bay.
Set up a Local Account
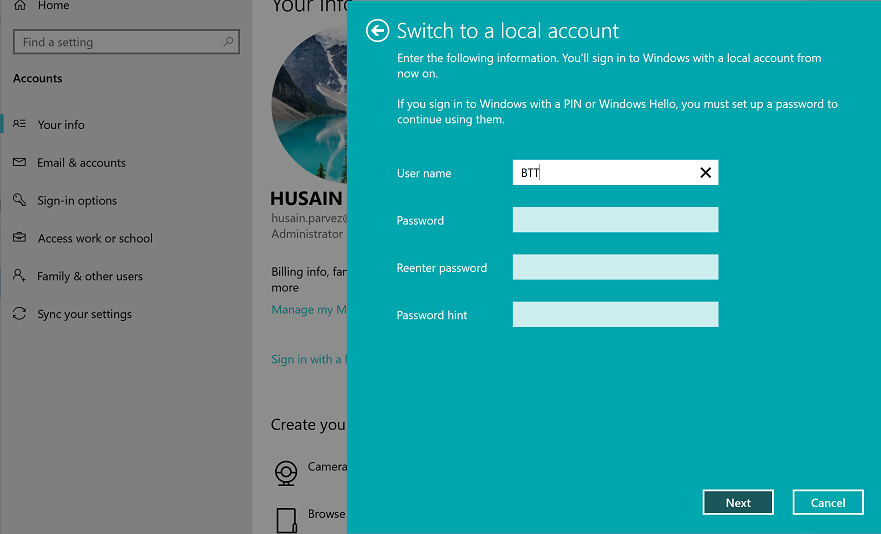
If you don’t use Microsoft service such as Office 365 and OneDrive across different devices, there’s little to no reason for using your Microsoft account for logging into your Windows 10 PC. Instead of using your email address and password to access your computer, you can set up a local account with a Username and Password, just like you did on older Windows operating systems.
- Head over to the Settings app through the Start menu of your Windows 10 PC.
- Open the Accounts tab, navigate to Your info and click the link that reads – Sign in with a local account instead.
- Enter your Microsoft account password to access the settings.
- Enter your User name, Password, Reenter Password and then a Password hint along with it.
- When you log into your Windows 10 computer, you will be able to use the local account to access the system.
Manage Cortana Privacy Settings

The smart voice assistant developed by Microsoft is undoubtedly a step into the future but also takes a considerable chunk out of your privacy too. Since Cortana can actively hear you, browse through your offline data, scan through emails, and so much more, there’s a bunch of private data funnelled through it. Fortunately, there is a way to filter what privacy permissions you grant Cortana in concern to your user data.
- Go to the Settings app on your Windows 10 computer and open the Cortana tab.
- From the section on the side, select the Permissions & History tab.
- Under the Permissions section, click on the link that reads “Manage the information Cortana can access from this device”.
- You can enable or disable access from Cortana to Location, Contacts, Emails, Browsing History, and more.
- You can then go back to select “Manage the information Cortana can access from other services”.
- From the Connected services tab, you will be able to choose which services (Skype, Outlook, Gmail, etc.) Cortana can access for a personalized experience.
General Privacy Options
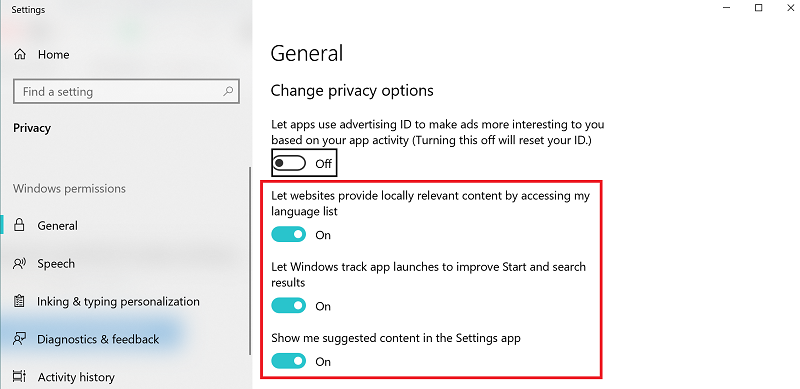
Apart from the selective options, there are a bunch of general privacy settings that include in the Windows 10 system. Usually includes web-browser based local content, personalized suggestions that offered in the Start menu, and providing more accurate search results every time.
- Go to the Settings app on your PC and navigate to the Privacy tab that you see on the screen.
- Here you will be able to see privacy settings options that you can choose to disable or keep enabled for better user experience.
- Press the toggle switch right next to each of the options such as “Show me suggested content in the Settings app” and fine-tune the privacy options.
Disable Sync Settings

The way Microsoft has designed Windows 10 to work is quite similar to how Android OS works with your Google account. Your contacts, emails, calendar entries, app preferences sync from your phone to your registered Google account and windows 10 PC platform. Fortunately, Windows 10 offers you the ability to control the aspects of your user data synced across other devices associated with your Microsoft account.
- Head over to the Settings app on your Windows 10 computer and click on the Accounts button.
- Select the “Sync your settings” tab on the sidebar on the screen.
- Here you can choose to disable Sync settings entirely, or you can disable Individual sync settings as well.
Bonus: Use W10Privacy
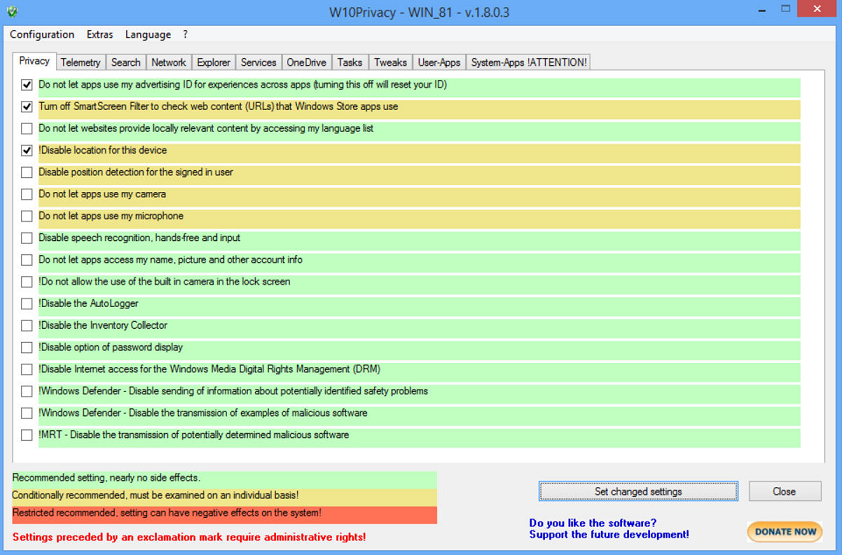
Since privacy concerns are widespread among Windows 10 users, and there are millions of Windows 10 users out there, it should not be surprising to find out that there are a bunch of third-party privacy tools out there for you to try out. Rather than going too deep into the list, we’ve hand-picked W10Privacy, as it offers the simplest way to manage all of the privacy settings on your Windows 10 computer.
There are ten different security and privacy tabs that you can toggle on or off based on your preference the options are colour-coded in green, yellow, and red, where green is a recommended setting, yellow is conditional. Red denoted settings that have adverse effects. Makes it easy even for newbie Windows 10 users to successfully choose their privacy settings without hindering their user experience.
Final Words
Along with options, you get to fine-tune the privacy settings of your Windows 10 computer; there is also the ability to manage all of it from the Microsoft Privacy Dashboard. By signing into your privacy dashboard account using the Microsoft account login, you can manage the browsing data, review the location data saved by your devices, edit and clear the search history and so much more.
Are you among those privacy geeks who will be making the most out of these privacy settings on your Windows 10 PC to make your user experience more secure? Be sure to share your thoughts on it in the comments section below.
Related Posts.
- Building Your Own Windows 10 PC? Best Practices.
- Best Hidden Features in Windows 10.
- DuckDuckGo vs Google- Why You Should be Using it?
- Petya (NotPetya) Ransomware is Taking over WannaCry.
- Want To Install Opera free VPN?
- Best VPN for Australia- Why The Need It
- 4 Ways To Keep Facebook Privacy In Check.
- The Surveillance State: The CIA Can Wiretap YOU.