If your child is addicted to gaming on the Switch, you need to set parental controls on your Nintendo Switch to curb the play time. Here’s the complete guide on how to set up parental controls on your Nintendo Switch to save your child’s future and eyes.
Must Read: Nintendo Switch Tips And Tricks You Need To Know
For as long as the gaming industry has existed, kids and adults alike have been addicted to it, spending hours at a stretch in the virtual world. While the ability to monitor gaming habits did not exist earlier on gaming consoles and gadgets, the growing concern over gaming addiction amongst the young has forced the hand of developers to include some form of parental lock or guidance feature into the system of mobile phones, tablets, and even gaming consoles.
Whether you’re trying to limit the hours of gameplay that your child can enjoy during the daytime or want to shield them from unsafe and adult content, parental controls are a necessary element in most cases. Nintendo has always been a family-friendly company from the get-go, whether it is their style of game development or the content they offer for public viewing. This is why the Nintendo Switch packs a number of features under the Parental Controls system, allowing you to monitor the activities of your young one.
How to enable Parental Controls on Nintendo Switch
The first time you turn on the Nintendo Switch console and begin setting it up, you will have the option to set up Parental Controls right from the start. However, if you’ve already set up your Switch without Parental Controls, you can still do so by heading over to the System Settings menu.

- Open the System Settings tab from the Home screen on your Nintendo Switch gaming console.
- Scroll down in the menu screen and select the Parental Controls tab.
- Select the System Settings option and then open the Parental Controls option.
- Select on Parental Controls Settings on the right side of the screen and tap on Use this console.
- Select the Parental Control Settings menu, tap on Use This Console and then choose Select Restriction Level.
- You can choose Teen, Pre-Teen, or Child to create a pre-made setting from the menu.
- Choose the Restriction Level, then select an age restriction
There will also be the option to select Custom Settings to if you wish to manually configure your Parental Control settings. All you need to do is:
- Select the Restrict Software option to manually select the software rating restrictions for your device.
- You have the option to select games rated ages for 3+ up to games rated for ages 18+.
- Select the Software Rating Organization option to change the region for your ratings regulations.
- Choose the Post to Social Media option to restrict or derestrict the ability to post screenshots to your social media accounts.
- Choose the Communicating with Others option to decide if the user can send and receive messages and chats, fetch user profile information, view and even share images with other users.
Once you’re done manually configuring Parental Controls on the Nintendo Switch, simply press the Next button to save your settings. You will then need to enter a 4-8-digit PIN, which will need to be entered every time you in order to access the Parental Controls.
Using Nintendo Switch Parental Controls app
Since the Japanese gaming company is religiously dedicated to keeping their user environment family-friendly, it has developed an entire app to grant you parental controls on your hybrid gaming console. With the Nintendo Switch Parental Controls app for Android and iOS, you can seamlessly monitor your kids’ activities, limit the content they have access to, and even control the usage of the Switch remotely.

Download the Nintendo Switch Parental Controls app
- Launch the Nintendo Switch Parental Controls app on your mobile device.
- Create or sign into your Nintendo Account from the app.
- Tap the Next button when asked to confirm that your Nintendo Switch will be registered to the app.
- When you’re prompted to enter the code on your screen, follow the instructions to enter it on your console.
- Sign into the account, tap on the Next button, then enter the code on your Switch console.
- Now go ahead and launch the System Settings on your Nintendo Switch and select the Parental Controls tab.
- Head to System Settings – Parental Controls – Parental Controls Settings and select the Use your Smart Device option.
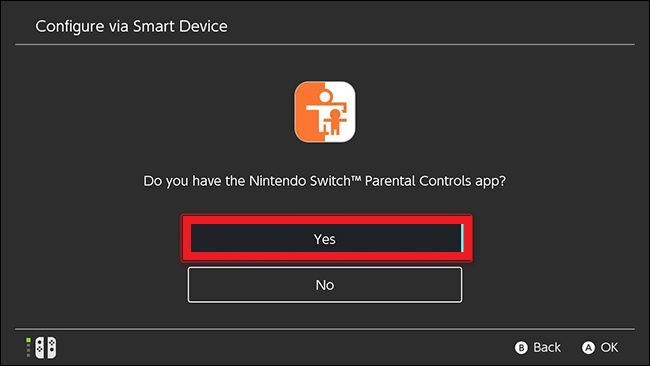
- Choose Yes when you’re asked if you have the Parental Controls app on your device and then select Enter Registration Code.
- Enter the registration code you see on your mobile device and press OK.
- Head back to the Nintendo Switch Parental Controls app on your phone and tap on Set Parental Controls.
- You can set a daily limit on play time from no limit up to six hours.
- Under the Select restriction level option, tap on None and then select Teen, Pre-Teen, or Child option to create a pre-made setting for parental controls.
- You can then enable push notifications to get a summary of your Nintendo Switch game activity each month.
How to Enable Parental Controls on Nintendo eShop
If you’ve had kids around for long enough, there’s a good chance that you’ve suffered from the shock of seeing unwanted in-app purchases in your billing history. If you’ve got a Nintendo Switch that is shared between the family and with the payment details saved, you might want some protection in place to restrict the kids from making unsolicited purchases on the Nintendo eShop without your explicit permission.
- Select the System Settings from the Home screen on your Nintendo Switch console.
- Scroll all the way down to find Users menu and tap on it.
- Select the System Settings menu and then choose the Users option.
- Choose the account that you wish to set up password restrictions in the Nintendo eShop for.
- Now scroll down, Nintendo eShop Settings – Password-Entry Settings and select the Change option.
- Select the Enter button and then press the Save or A button on your Joy-Con controller to save it.
Wrapping it up
While parental controls feature has been a major part of the system options on almost every mobile and console platform, it goes a mile ahead on the Nintendo Switch. Allowing you to not only limit the games that the young ones can access based on their age ratings, you even get the ability to set up cool down times for when they’ve been clued to the console for too long. If you’re a parent who’s looking to put the foot down when it comes to gaming on the Nintendo Switch, all you need to do is follow the guide above. Be sure to ask away any questions that you may have in the comments section right down below.