
Are you tired of finding a solution on how to browse blocked sites in India, but came up empty? This tutorial is just what you need to bypass the blockade.
With a population of more than a billion, India is home to millions of people who connect to the World Wide Web every day. To uphold their cyber laws, the Indian Government recently banned hundreds of websites altogether. While some of these websites are involved with pornography and online piracy, not all of them are harmful.

For instance, services like AdFly and Google URL Shortening Service is also blocked by the Indian authorities for a majority of users. If you are among those who have been affected by this extensive ban and need a working method on how to browse blocked sites in India, follow the guide below.
How to Browse Blocked Sites in India
Method 1: Use Google DNS to Unblock Websites
One of the safest ways to combat website blocking is by changing the DNS address of your computer to the Google Public DNS IP addresses. Not only is the Google Public DNS a safe way to browse the internet, but it also ensures dedicated speed regardless of the website.
1. From the desktop of your computer, navigate to the “Control Panel.”
2. In the Control Panel, locate and click on “Network and Sharing Center,” and then click on “Change adapter settings” tab.
3. Now go ahead and select the type of connection for which you want to configure the Google Public DNS. For instance:
- To change settings for an Ethernet connection, right-click the “Local Area Connection” tab and click on ‘properties.’
- To change settings for a wireless connection, right-click the “Wireless Network Connection” tab, and click on “Properties.”
If you are being prompted for the administrator password or confirmation, type the password or provide confirmation and continue.
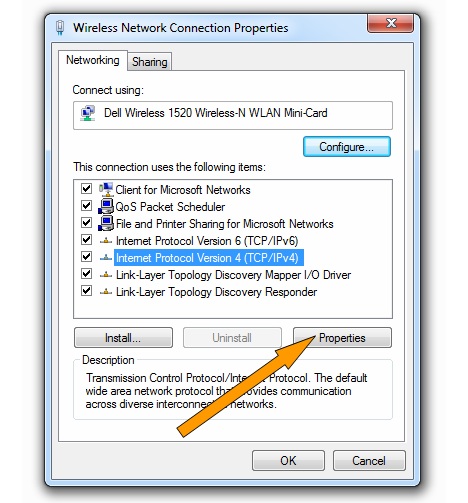
4. Select the “Networking” tab from the pop-up window. Under the “This connection uses the following items” tab, select “Internet Protocol Version 4 (TCP/IPv4)” or “Internet Protocol Version 6 (TCP/IPv6)” and then click on “Properties.”
5. Click the “Advanced” tab and then select the “DNS” tab. If there are any DNS server IP addresses already listed in the fields, write them down somewhere for future reference, and remove them from the window.
6. Click “OK” and then select the “Use the following DNS server addresses” tab. If there are any IP addresses already listed in the “Preferred DNS server” or “Alternate DNS server” tabs, make sure to write them down for future reference.

7. Now go ahead and replace the addresses with the following IP addresses of the Google DNS servers:
- For IPv4: 8.8.8.8 or 8.8.4.4.
- For IPv6: 2001:4860:4860::8888 and/or 2001:4860:4860::8844

8. You can now exit the Control Panel, restart your computer and check if the websites have been successfully unblocked.
Method 2: Use a VPN (Virtual Private Network)
While using the Google Public DNS is a viable method on how to browse blocked sites in India, it does not work every time. For instance, if your connection is bound to a fixed DNS address, you will not be able to browse the internet by altering it.
This is where the technology of virtual private networks or VPN comes in to save the day. By using a reliable VPN, you can virtually change your IP address, thus allowing your devices to visit the websites that are blocked for the Indian IP addresses.

1. Begin by downloading a reputed VPN service provider such as Hola Free VPN Proxy. This particular service is free to use and available as an app for Android and as an extension for the Google Chrome web browser.
Download Hola Free VPN Proxy Android App
Download Hola Free VPN Proxy Chrome Extension
2. You can also jump over to the Settings in Google Chrome and enable the extension manually if required. Once you have enabled the extension on Google Chrome, you will be able to see the Hola extension next to your URL bar.
3. Now go ahead and open any of the websites that have been blocked by your ISP under the directive of the Indian authorities. Now tap on the Hola icon on the top-right corner and change your region from India to the United States or any other.

4. The VPN service will now create a fake IP address and allow you to browse the blocked website without any problem whatsoever.
Were you finally able to access all the websites that had previously been blocked by your ISP? If you need more assistance on how to browse blocked sites in India, check out the video tutorial given below: